In previous blog we went over the Kubernetes service discovery, load balancing and network policies. In this blog we will use Kube-router a distributed load balancer, firewall and router for Kubernetes and demonstrate the Kubernetes networking constructs in action.
We will setup a Kubernetes cluster from scratch and use kube-router instead of kube-proxy and demonstrate how kube-router provides a solution for cross-node pod-to-pod networking, provides a service proxy on each node and load balances the traffic. We will also see the network policies in action.
cluster setup
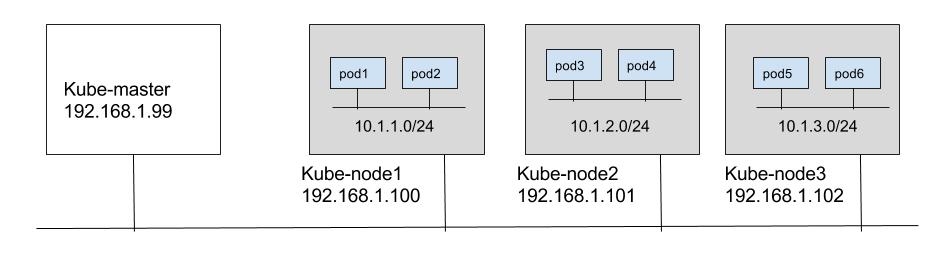
We will setup a 3 node kube-node1 (192.168.1.100), kube-node2 (192.168.1.101), kube-node3 (192.168.1.102) as a cluster nodes and use kube-master (192.168.1.99) as Kubernetes master node. Master and nodes are in subnet 192.168.1.0/24. We will use 10.1.0.0/16 ip range for pod ip’s with Kube-node1, kube-node2 and kube-node3 using 10.1.1.0/24, 10.1.2.0/24 and 10.1.3.0/24 subnets respectively as shown in below diagram.
On kube-master download the latest stable kubernetes master (1.6.1 at the point of writing this blog) components from below URL’s
curl -O https://storage.googleapis.com/kubernetes-release/release/v1.6.1/bin/linux/amd64/kube-apiserver
curl -O https://storage.googleapis.com/kubernetes-release/release/v1.6.1/bin/linux/amd64/kube-controller-manager
curl -O https://storage.googleapis.com/kubernetes-release/release/v1.6.1/bin/linux/amd64/kube-scheduler
We will assume etcd is installed on the kube-master and Docker is installed on all the nodes kube-node1, kube-node2, kube-node3.
On kube-master node provide appropriate etcd details for the ‘–etcd-servers’ flag when running Kube-apiserver. Run below Kubernetes components on kube-master as below. We will use 172.16.0.0/16 as cluster IP range. As we will see IP’s from cluster ip range will be allocated for services.
Kube-router will not do subnet management and depends on the kube-controller-manager to do subnet allocation for the nodes from cluster CIDR range. So we will launch kube-controller-manager with kube-controller-manager and \--allocate-node-cidrs flags. Also inorder to run kube-router in the host namespace when run as daemonset, we will allow kubernetes to privision pods in the host namespace by passing \--allow-privileged=true falg to kube-apiserver.
nohup kube-apiserver --etcd-servers=http://127.0.0.1:2379 --insecure-bind-address=192.168.1.99 --service-cluster-ip-range=172.16.0.0/16 --allow-privileged=true > /dev/null 2>&1 &
nohup kube-controller-manager --master=http://192.168.1.99:8080 --cluster-cidr=10.1.0.0/16 --allocate-node-cidrs=true  > /dev/null 2>&1 &
nohup kube-scheduler --master=http://192.168.1.99:8080  > /dev/null 2>&1 &
On each of the nodes (kube-node1, kube-node2, kube-node3) download the stable kubelet.
curl -O https://storage.googleapis.com/kubernetes-release/release/v1.6.1/bin/linux/amd64/kubelet
Download the CNI plugins from https://github.com/containernetworking/cni/releases and extract them in to /opt/cni/bin folder on each of the nodes (kube-node1, kube-node2, kube-node3).
On each node create CNI conf file at /etc/cni/net.d/10-kuberouter.conf by running
wget -O /etc/cni/net.d/10-kuberouter.conf https://raw.githubusercontent.com/cloudnativelabs/kube-router/master/cni/10-kuberouter.conf
or create manually with below content. Kube-router will require to use bridge CNI plugin, and host-local plugin for IPAM. Subnet details need not be specified as kube-controller-manager automatically does the subnet allocation for the nodes.
{
  "name": "mynet",
  "type": "bridge",
  "bridge": "kube-bridge",
  "isDefaultGateway": true,
  "ipam": {
     "type": "host-local",
  }
}
On each node launch kubelet as below. We need to pass on location of CNI plugins for the \--network-plugin-dir flag, and CNI conf file location for \--cni-conf-dir. We need to run kubelet with \--allow-privileged flag set to true so that kube-router can be launched pod in host namespace.
nohup kubelet --api-servers=http://192.168.1.99:8080 --network-plugin-dir=/opt/cni/bin --network-plugin=cni --cni-conf-dir=/etc/cni/net.d/ --allow-privileged=true > /dev/null 2>&1 &
Ok, now the cluster is setup almost. We will use Kube-router instead of Kube-proxy to complete the cluster setup. We have two options to run Kube-router.
run Kube-router as agent on each node
Build the kube-router from the sources.
git clone https://github.com/cloudnativelabs/kube-router.git
go build --ldflags '-extldflags "-static"' -o kube-router kube-router.go
Alternativley you can download prebuilt binary:
wget https://github.com/cloudnativelabs/kube-router/releases/download/v0.0.1/kube-router
chmod +x kube-router
Run kube-router on all nodes as below. We will use kube-router to provide pod-to-pod networking, service proxy and firewall for the pods.
kube-router --master=http://192.168.1.99:8080/ --run-router=true --run-firewall=true --run-service-proxy=true
run Kube-router as deamonset
This is quickest way to deploy kube-router. Just run
kubectl apply -f https://raw.githubusercontent.com/cloudnativelabs/kube-router/master/daemonset/kube-router-all-service-daemonset.yaml
Above will run kube-router as pod on each node automatically.
Now the cluster is setup with Kube-router providing service proxy, pod ingress firewall and for pod networking. Let see the demo how Kube-router provide these functionality.

conclusion
We have seen how Kube-router is used in a Kubernetes deployment to provide cross node pod-to-pod connectivity, how kube-router provides a service proxy on each node and how ingress firewall to the pods are applied in action.